For combining Folderize with a Community, there are a variety of technologies that you may use in your Salesforce org. This page provides multiple instructions depending which approach you have adopted.
Contents
Introduction
First, Salesforce provides several frameworks for configuring Community sites:
- Aura. The following templates are based on this framework:
- Build Your Own (Aura);
- Customer Account Portal;
- Customer Service;
- Help Center;
- Partner Center.
- Lightning Web Runtime (LWR). The following templates are based on this framework:
- Build Your Own (LWR);
- B2C Commerce (LWR);
- Microsite (LWR).
- Visualforce. Only the “Salesforce tab + Visualforce” template is based on this framework.
Folderize itself provides two user interface components based on two different Salesforce technologies:
- Folderize Classic. This is based on Visualforce and supported by all Community frameworks;
- Folderize Lightning (LEX): supported by Aura and LWR frameworks.
(As of v. 5.3, Folderize LEX is a read-only environment; for edit operations it will open Folderize Classic in a separate tab. LEX will gain additional capabilities in subsequent releases.)
And Folderize supports two different modes (see Introduction to Folderize):
- Full Mode — shows all folders and documents;
- Object-Record Mode — shows only files attached to a record (and possibly only folders related to the Object).
Below you will find a relevant section according to the Community framework you use, your preferred Folderize user interface, and Folderize mode.
Aura and LWR Frameworks
Folderize Lightning
There is no significant difference between “Lightning Experience Builder” (used for internal apps and pages) and “Digital Experience Builder” (used for community pages). Thus you will find all necessary information in this common article: Lightning Components. The article covers both Full Mode and Object-Record Mode.
Folderize Classic (Full Mode)
This section explains how to add Folderize Classic working in the Full Mode to your Aura or LWR Community.
There are several ways to add Folderize Classic to a community.
1. Use Visualforce Page Component:
This is the fastest way to configure your template.
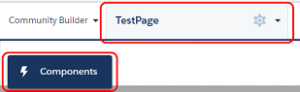
a. Open the Community Builder and select necessary page from the drop down list in the header.
b. Click the Components button at the left side.
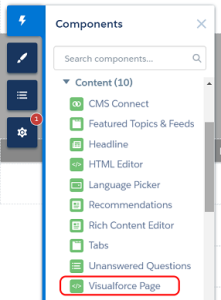
c. Find the Visualforce Page component in the list. Drag and drop the component to necessary place.

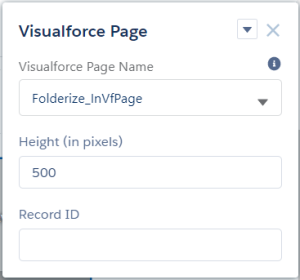
d. In the right corner of the builder you will see a popup window with the parameters of the component. Select the Folderize page, and set height (555 px, for example).
e. Publish and check that the page is working.
Though the technique above may be adequate for you, there are a couple of potential issues:
- A vertical scroll bar may appear in the site component.
- You cannot pass additional parameters to the Folderize page, e.g. isInIframe, initDelayInMs or linkedRecordId.
To solve these two issues, if needed, you can create an intermediate Visualforce page that will include Folderize within an iframe. To accomplish that, use the procedure that follows instead of what is above.
2. Use Intermediate Visualforce page:
As an alternative to the approach above, create a custom intermediate Visualforce page that will include the Folderize page within an iframe.
a. Start either at:
Setup | Custom Code | Visualforce Pages | New
or in Developer Console:
File | New | Visualforce Page
Give your page a name, for example “Folderize_InVfPage”.
If the options above are not available, an administrator needs to enable the system setting Customize Application for you. Also you may need to go to Settings | My Personal Information | Advanced User Detail then enable Development Mode, Show View State in Development Mode.
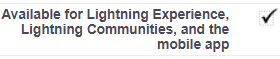
b. Make sure the checkbox Available for Lightning Experience…. is selected. (The checkbox does not appear in Developer Console; go to Setup | Custom Code | Visualforce Pages to turn it on.)
c. Delete the default Visualforce markup code, copy in the following block instead, and save. If desired, replace 500 with the number of pixels high you want your component to be.
<apex:page standardStylesheets="false">
<style>
     body
     {
          margin: 0 !important;
          padding: 0 !important;
     }
</style>
     <apex:iframe src="{!$Page.sharem__Folderize}?isdtp=vw&isInIframe=true&initDelayInMs=200" height="500px">
     </apex:iframe>
</apex:page>
d. Now follow the steps above of method (1) Use Visualforce Page Component, but step (d) is different:
- In (1)(d): Use the new intermediate Visualforce page you created; and
- set height of the site component equal to the height chosen in step (2)(c).
3. Use a Custom Lightning Component:
As an alternative to the procedures above, you can create a custom Folderize component for a Community.
a. Open the home page in your community. Click into address bar. Copy the URL from beginning to the end of community suffix (ignore “/s” path). For example, you might have something like this: https://na162.force.com/myCustomerService
b. In the example code below, replace bold part of the URL with what you copied in previous step.
<aura:component implements="forceCommunity:availableForAllPageTypes" >
<iframe src="https://na162.force.com/myCustomerService/apex/sharem__Folderize?isdtp=vw&isInIframe=true&initDelayInMs=200" width="100%" height="580px" scrolling="no"/>
</aura:component>c. Go to: Setup | Developer Console.
d. Then: File | New | Lightning Component. Enter a name of your component. Click the “Submit” button.
e. Copy in the code from above, as modified. Save.
f. Put the new component on the layout in the community builder using drag-&-drop.
Folderize Classic (Object-Record Mode)
This section explains how to add “Folderize Classic” working in the Object-Record Mode to your Aura or LWR Community.
Before starting, set up object-record mode for internal users.
We’ve prepared several scenarios for you. Select the appropriate one:
1. Add On A Record Layout
Follow these steps:
- Open the Record Details page in the Builder;
- Follow the instructions given in section 1. Visualforce Page Component above.
After that, the id of a record will be automatically passed to the Folderize page. It will recognize the id and start in the Object-Record Mode.
2. Intermediate Visualforce Page With Record id
This approach is needed when the id of a needed record cannot be taken by Salesforce from the context. For example, you may have a custom Visualforce page that is not a record-page. In this case, you are responsible for passing the right record id to Folderize.
This approach is almost the same as the one described in 2. Use Intermediate Visualforce page above, but the difference is that you also explicitly pass record Id to the Folderize page in iframe.
If you look at the template below, you will notice the additional “id” parameter with “VARIABLE_WITH_RECORD_ID” placeholder:
<apex:page standardStylesheets="false">
<style>
     body
     {
          margin: 0 !important;
          padding: 0 !important;
     }
</style>
     <apex:iframe src="{!$Page.sharem__Folderize}?isdtp=vw&isInIframe=true&initDelayInMs=200&id={!VARIABLE_WITH_RECORD_ID}" height="500px">
     </apex:iframe>
</apex:page>
In general, you would replace the placeholder with the variable that stores the needed record id. This depends on your needs and implementation. For example, it can be a global variable, hardcoded value, etc.
3. Implementation With User Account
For customers using a Community, a common need is to show to the community user, documents related to a record — typically the account of the logged in user. But there’s a complication: In Visualforce markup, Salesforce (as of October 2023) does not allow taking the AccountId field from the $User global variable. So how is Folderize to know the user’s Account Id?
You can use a workaround: Get Account Id via SOQL query in an Apex controller, then call that in the Visualforce page. Instructions to accomplish this are below. (You do not need to know Apex programming to put it all together; the steps are given below).
Create Apex Controller
This gets the needed Account id.
Start either at:
Setup | Custom Code | Apex Classes | New
or in Developer Console:
File | New | Apex Class
Give your class a name, for example “FolderizeORM_InVfPageCtrl”.
If the options above are not available, an administrator needs to enable the system setting Customize Application for you.
Copy in the following block, using the class name you specified where shown in bold. Save.
public class FolderizeORM_InVfPageCtrl
{
    //Variables
    private String userAccountId;
    //

    //Properties
    public String getUserAccountId()
    {
        if (this.userAccountId == null)
        {
            User currentUser = [SELECT AccountId FROM User WHERE Id = :UserInfo.getUserId()];
            this.userAccountId = currentUser.AccountId;
        }
        return this.userAccountId;
    }
    //
}
Create Visualforce Page
Now follow instructions in the section 2. Use Intermediate Visualforce Page above, but use instead the following markup for the Visualforce page, which references your new controller. Be sure the name (shown in bold) matches what you named your controller.
<apex:page controller="FolderizeORM_InVfPageCtrl" standardStylesheets="false">
<style>
	body
	{
		margin: 0 !important;
		padding: 0 !important;
	}
</style>
	<apex:iframe src="{!$Page.sharem__Folderize}?isdtp=vw&isInIframe=true&initDelayInMs=200&linkedRecordId={!userAccountId}" height="500px">
	</apex:iframe>
</apex:page>
Visualforce Framework
Of course, only “Folderize Classic” can be added to a Community of this type.
To add our component in such a Community:
- Go to the Community’s Administration;
- In the left panel, switch to Tabs section;
- Find the Folderize tab in the list of available tabs and move it to the selected tabs:

- Click Save.
